こんにちは!
デザイナーの伊東(@ALAKIWebVRAR1)です。
※TwitterでもWebARの事を中心に情報発信中!
よかったらフォローお願いしますm(_ _)m
Follow @ALAKIWebVRAR1
昨年9月に、WebブラウザからマーカーレスAR体験が可能な「8th Wall Web」というプラットフォームをご紹介しました。
8thWallが8thWallWebを発表!WebブラウザからでもマーカーレスARが体験可能に
その時点ではまだデモ動画しか公開されていない状態でしたが、先日ついに正式版がリリースされました!
8th Wall Webリリース前にも、ARkit2を利用したマーカーレスWebARは実装可能でした。
ただ、ARkit2を利用するということは、動作環境がiOS12以上の端末に限られることになります。
8th Wallは、OSに依存しない、Androidにも対応したWebAR開発を実現します。
今回はその8th Wall Webのアカウントの作成から、アプリケーションの作成、実装方法までご紹介します!
下の動画のような、インタラクティブなWebARのサンプルが作れるようになるところまでを目標に進めていきます。
最後までよろしくお願いします!
アカウントの作成
まずは8th Wallのアカウントを作成していきましょう。
下記のサイトにアクセスして、右上にある”Create Account”のリンクを押してください。
https://8thwall.com/

アカウント情報を入力する画面に遷移しますので、
必要な情報を入力しましょう。
「I would like to:」の項目は、「web」を選択してください。

「Get Started」と書かれたボタンをクリックすると、
自動返信メールが届きます。
メールに記載されたアドレスをクリックして、
アカウント作成を完了させましょう。
アプリケーションの作成
アカウントの作成が完了していれば、「Log In」ボタンを押して管理画面にログインしてみましょう。

まだ新しいアプリケーションを登録していなければ、
「+ Create a new Web App」から登録を行います。

任意のアプリケーション名を入力して、「+ Create」ボタンをクリックしましょう。
すると、ダッシュボードに新しく追加されたアプリケーションが表示されました!

ダッシュボードの右下に、8th Wall Webのプラグインを読み込むためのコードがあります。
このコードの「appKey=””」の中の文字列が、アプリケーション固有のキーになります。
8th Wall Webのプラグインを使用する際に必ず必要になりますので、控えておきましょう。
実装方法
それではいよいよ実装方法についてご紹介します。
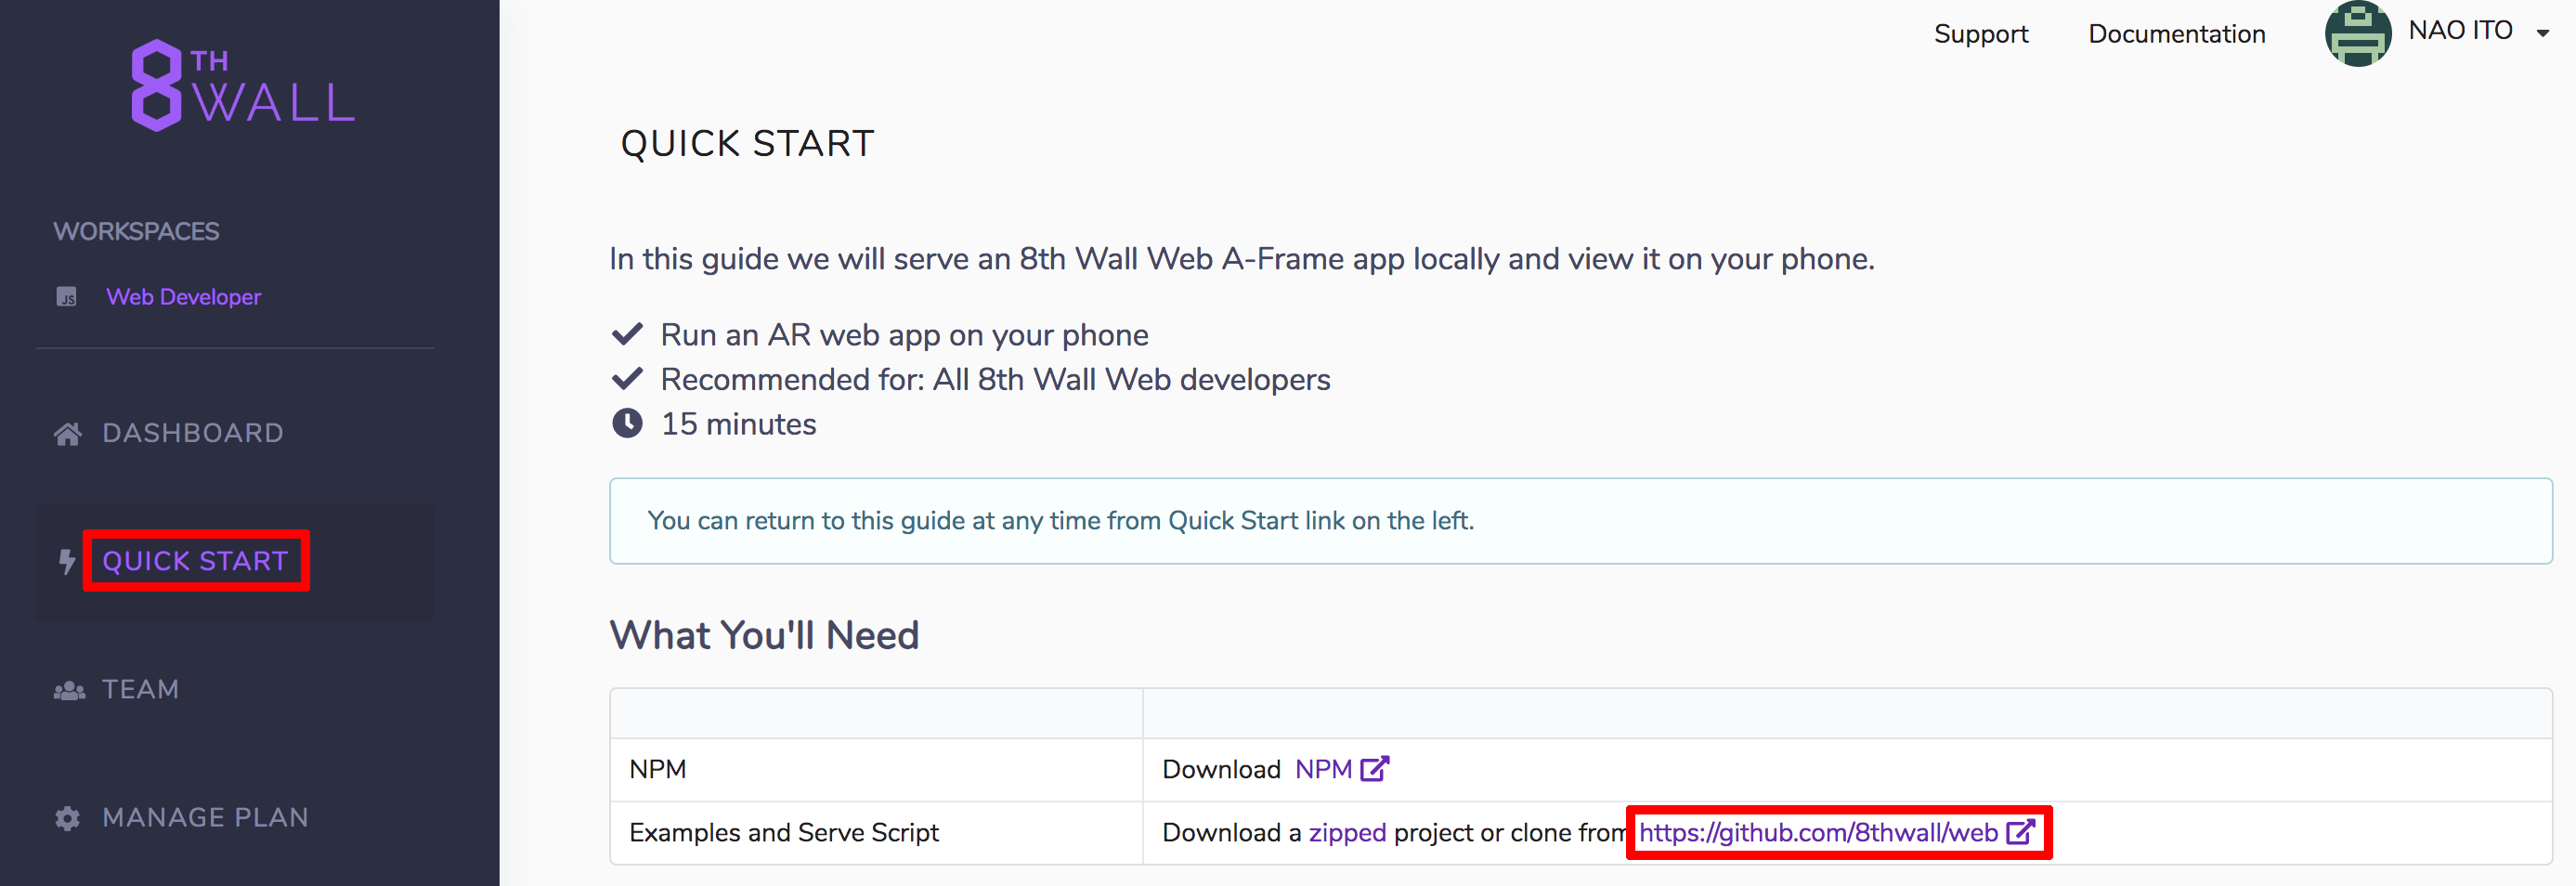
管理画面左側の「QUICK START」をクリックし、
「What You’ll Need」の所にGithubのURLが記載されています。
そこからGithubに移動して、データ一式をダウンロードしてください。
ダウンロードした「web-master」の中の「examples」に移動しましょう。
その中に、「aframe」や「threejs」というフォルダがあるかと思います。
8th Wall Webは単体で動作するものではなく、A-frameやthree.jsと合わせて使用するものです。
今回はA-frameと合わせて開発していきたいので、「aframe」フォルダのサンプルを使用しましょう。
※A-frameを使ったWebAR開発に関しては、こちらの記事もご参考ください
WebARはじめてみませんか?〜第1回 AR.jsで簡単WebAR〜
ダウンロードしたデータの中には、3種類のサンプルが用意されています。
「placeground」と「portal」と「tossobject」の3つのサンプルです。
今回は「tossobject」フォルダの中身をサーバーにアップしましょう。
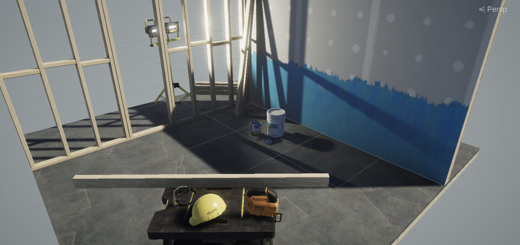
スマホまたはタブレットで、アップロードしたページを確認します。
カメラの利用を許可すると、無事にWebARの画面に遷移しました!
画面をタップすると、トマトの形をしたオブジェクトが前方に投げられました。
8th Wall Webは、ユーザーの挙動に合わせて3Dオブジェクトをアニメーションさせるなど、
インタラクティブな機能の実装を得意としています。
ソースコードは以下のようになっています。
|
1 2 3 4 5 6 7 8 9 10 11 12 13 14 15 16 17 18 19 20 21 22 23 24 25 26 27 28 29 30 31 32 33 34 35 36 37 38 39 40 41 42 43 44 45 46 47 48 49 50 51 52 53 54 55 56 57 58 59 60 61 62 63 64 65 66 67 68 69 70 71 72 73 74 75 76 77 78 79 80 81 82 83 84 85 86 87 88 89 90 91 92 93 94 95 96 97 98 99 100 101 102 103 104 105 106 107 108 109 110 111 112 113 114 115 116 117 118 119 120 121 122 123 124 125 126 127 128 129 130 131 132 133 134 135 136 137 138 139 140 141 142 143 144 145 146 147 148 149 150 151 152 153 154 155 156 157 158 159 160 161 |
<!DOCTYPE html> <html> <head> <meta charset="utf-8"> <title>8th Wall Web: Toss an Object</title> <!-- We've included a slightly modified version of A-Frame, which fixes some polish concerns --> <script src="//cdn.8thwall.com/web/aframe/8frame-0.8.2.min.js"></script> <script src="//cdn.8thwall.com/web/aframe/aframe-physics-system-3.2.0.min.js"></script> <script src="//cdn.8thwall.com/web/aframe/aframe-animation-component-5.1.2.min.js"></script> <!-- XR Extras - provides utilities like load screen, almost there, and error handling. See github.com/8thwall/web/xrextras --> <script src="//cdn.8thwall.com/web/xrextras/xrextras.js"></script> <!-- 8thWall Web - Replace the app key here with your own app key --> <script async src="//apps.8thwall.com/xrweb?appKey=XXXXXXXX"></script> <script> AFRAME.registerComponent('shoot-tomato', { init: function() { const camera = document.getElementById('camera') const splatSnd = document.querySelector('#splat').components.sound this.el.sceneEl.addEventListener('touchstart', event => { // Create element to be thrown, setting position, scale, and model const tomato = document.createElement('a-entity') tomato.setAttribute('position', camera.object3D.position) tomato.setAttribute('scale', '0.0175 0.0175 0.0175') tomato.setAttribute('gltf-model', '#tomatoModel') // Choose a random rotation offset for some variation const randomRotation = { x: -90 + Math.random() * 30, y: Math.random() * 360, z: 0 } tomato.setAttribute('rotation', randomRotation) // Set velocity, rotated with camera direction const velocity = new THREE.Vector3(0, 0, -10) velocity.applyQuaternion(camera.object3D.quaternion) tomato.setAttribute('velocity', velocity) // Add physics body tomato.setAttribute('body', { type: 'dynamic', sphereRadius: 0.35, shape: 'sphere' }) // Add tomato to scene this.el.sceneEl.appendChild(tomato) // The splat is created at the same time as the thrown tomato so // there is time to load the model before it hits the ground const splatBase = document.createElement('a-entity') splatBase.setAttribute('visible','false') // The splat consists of a model wrapped in an empty // parent so we can apply the correct scaling animation const splat = document.createElement('a-entity') splat.setAttribute('gltf-model', '#tomatoModel') splat.setAttribute('scale', '0.0175 0.0175 0.0175') splatBase.appendChild(splat) this.el.sceneEl.appendChild(splatBase) let didCollide = false tomato.addEventListener('collide', event => { // Only want to do the splat once, and with the ground only if (didCollide || event.detail.body.el.id != 'ground') { return } didCollide = true //Stop previous splat sound splatSnd.stopSound() //Play splat sound splatSnd.playSound() // Copy positioning of thrown tomato to splat splatBase.object3D.position.copy(tomato.object3D.position) splat.object3D.rotation.copy(tomato.object3D.rotation) splatBase.object3D.visible = true tomato.setAttribute('visible', 'false') // We can't remove the thrown tomato until the physics step is over setTimeout(() => { tomato.parentNode.removeChild(tomato) }, 0) // Using animation component to show flattening splatBase.setAttribute('animation__scale', { property: 'scale', from: '1 1 1', to: '3 0.1 3', dur: 500, easing: 'easeOutQuad' }) // After 2.5 seconds, shrink the splat away and delete it setTimeout(() => { splatBase.setAttribute('animation__scale', { property: 'scale', from: '3 0.1 3', to: '0.001 0.001 0.001', dur: 1500, easing: 'easeInQuad' }) setTimeout(() => splatBase.parentNode.removeChild(splatBase), 1500) }, 2500) }) }) } }) </script> </head> <body> <!-- We must add the shoot-tomato component to the scene so it has an effect, as well as the physics component --> <a-scene xrweb shoot-tomato physics="iterations: 1" xrextras-almost-there xrextras-loading xrextras-runtime-error> <!-- We can define assets here to be loaded when A-Frame initializes --> <a-assets> <!-- Credit to Poly by Google for the model: https://poly.google.com/view/dmzbb8UisNv --> <a-asset-item id="tomatoModel" src="tomato.glb"></a-asset-item> <!-- Credit to Mike Koenig for the sound clip: http://soundbible.com/642-Splat.html --> <a-asset-item preload="auto" class="a-sound" id="splatSrc" src="splat.m4a" response-type="arraybuffer"></a-asset-item> </a-assets> <a-camera id="camera" position="0 4 4"> <a-sound id="splat" src="#splatSrc"></a-sound> </a-camera> <a-entity light="type: directional; intensity: 0.8;" position="1 4.3 2.5"> </a-entity> <a-light type="ambient" intensity="0.5"></a-light> <!-- Adding the static-body component allows the ground to be collided with --> <a-box id="ground" material="transparent: true; opacity: 0" static-body scale="1000 2 1000" position="0 -1 0"> </a-box> </a-scene> </body> </html> |
重要な部分をかいつまんでご説明します。
トマトのオブジェクトとサウンドファイルの読み込み
まずは主要な外部リソースをあらかじめ読み込ませておきます。
今回はトマトの3Dオブジェクトと、投げた時の効果音のファイルを読み込ませましょう。
ソースコードの130行目あたりが読み込み部分にあたります。
|
1 2 3 4 5 6 |
<a-assets> <!-- Credit to Poly by Google for the model: https://poly.google.com/view/dmzbb8UisNv --> <a-asset-item id="tomatoModel" src="tomato.glb"></a-asset-item> <!-- Credit to Mike Koenig for the sound clip: http://soundbible.com/642-Splat.html --> <a-asset-item preload="auto" class="a-sound" id="splatSrc" src="splat.m4a" response-type="arraybuffer"></a-asset-item> </a-assets> |
コンポーネントの作成と呼び出し
次に、トマトを投げる動作をコンポーネントとして登録します。
ソースコードの20行目以降が該当箇所です。
|
1 2 3 4 5 |
AFRAME.registerComponent('shoot-tomato', { init: function() { 省略... } }); |
この中に、イベントハンドラを記述したり、処理を書いていきます。
この部分は後ほど詳しく見ていきます。
コンポーネントの記述が終わったら、A-frameのシーンを定義しているところで呼び出します。
|
1 2 3 4 5 6 7 8 9 |
<a-scene xrweb shoot-tomato physics="iterations: 1" xrextras-almost-there xrextras-loading xrextras-runtime-error> 省略... </a-scene> |
コンポーネント内に処理を記述する
それではいよいよメインの処理の部分を詳しく見ていきましょう。
まずは、ユーザーが画面をタップした時のイベントを監視するよう、
イベントハンドラを追加します。
|
1 2 3 |
this.el.sceneEl.addEventListener('touchstart', event => { 省略... } |
イベントハンドラ内に、トマトを投げる処理を記述していきましょう。
まずはA-frameの「a-entity」タグを空の状態で生成します。
|
1 |
const tomato = document.createElement('a-entity') |
生成したタグに、位置、縮小率、モデルの情報を追加していきます。
|
1 2 3 |
tomato.setAttribute('position', camera.object3D.position) tomato.setAttribute('scale', '0.0175 0.0175 0.0175') tomato.setAttribute('gltf-model', '#tomatoModel') |
位置はカメラと同じ位置、縮小率は1.75%にして、投げる前の最初の状態を作っています。
あらかじめ読み込んでおいたトマトのオブジェクトも、ここで反映させています。
さらに、ランダムでトマトを傾けてリアリティを出しています。
X軸とY軸に、Math.randomで生成した乱数を利用してタップするたびに傾きが変わるようにしていますね。
|
1 2 |
const randomRotation = { x: -90 + Math.random() * 30, y: Math.random() * 360, z: 0 } tomato.setAttribute('rotation', randomRotation) |
次に、投げる時の速度を設定します。
|
1 2 3 |
const velocity = new THREE.Vector3(0, 0, -10) velocity.applyQuaternion(camera.object3D.quaternion) tomato.setAttribute('velocity', velocity) |
「velocity」という属性が、速度を表すものです。
また、今回はトマトが地面にぶつかった時に潰れるアニメーションも実装しています。
「ぶつかった」という判定を得るために、「物理ボディ」というものを設定します。
|
1 2 3 4 5 |
tomato.setAttribute('body', { type: 'dynamic', sphereRadius: 0.35, shape: 'sphere' }) |
球体のボディを設定して、ぶつかり判定を得られるようにしました。
ここまで設定できたら、シーンにトマトのオブジェクトを追加します。
|
1 |
this.el.sceneEl.appendChild(splatBase) |
ここまでのコードで、トマトが投げられる動きが実装できました。
最後に、トマトが潰れるところの処理を少しだけ見て見ましょう。
まずは、あらかじめ潰れたトマトのオブジェクトを設定します。
|
1 2 3 4 |
const splat = document.createElement('a-entity') splat.setAttribute('gltf-model', '#tomatoModel') splat.setAttribute('scale', '0.0175 0.0175 0.0175') splatBase.appendChild(splat) |
この時点では「scale」の値がX軸、Y軸、Z軸共に均一に縮小されているため、正常な形のトマトのままです。
これを後ほどアニメーションをかけて潰す処理をかけたいと思います。
その前に、トマトが地面にぶつかった時の当たり判定を受け取れるようにしましょう。
先ほど設定した「物理ボディ」のおかげで、当たり判定を「collide」というイベントとして受け取ることができるようになりました。
|
1 2 3 |
tomato.addEventListener('collide', event => { 省略... }); |
この中にぶつかった時の処理を記述していきます。
まずは先ほど読み込ませておいた効果音のファイルを再生します。
もし連続でトマトを投げた場合、「stopSound()」で先に効果音を消す処理をしているので、音が何重にも聞こえるということはありません。
|
1 2 3 4 |
//Stop previous splat sound splatSnd.stopSound() //Play splat sound splatSnd.playSound() |
次に、先ほど用意しておいた、潰れたトマトのオブジェクトにアニメーションをかけます。
|
1 2 3 4 5 6 7 |
splatBase.setAttribute('animation__scale', { property: 'scale', from: '1 1 1', to: '3 0.1 3', dur: 500, easing: 'easeOutQuad' }) |
X軸とZ軸を300%に拡大していますが、Y軸を10%に縮小しているため、縦に潰れた形になります。
変化量にイージング処理をかけてあげることで、より滑らかなアニメーションになります。
以上、ざっくりですが、ここまでが今回のサンプルのコードとなります。
まとめ
いかがだったでしょうか?
A-frameだけではなかなか実現できなかったインタラクティブな表現が、8th Wall Webを利用すると可能になることがお分りいただけたでしょうか?
また、冒頭でも述べたように、8th Wall Webではこのような動きのあるAR体験がデバイスの垣根を超えてより多くの人に体験していただけるというメリットがあります。
アプリ型のARでは対応機種やOSが厳しく制限されていますが、デバイスで動作するため、その制限が緩和されています。
より多くのかたに向けてWebAR開発をされたい場合、一度8th Wall Webをご検討されて見てはいかがでしょうか?
ALAKIでは、デバイスの制限が少ないWebAR開発に力を入れています。
今回の記事に関する質問、WebARについてのご相談などは、
下記のリンクからお気軽にお問い合わせください。